Building a Rust library for DHT11 sensor: A Step-by-Step Guide
by Daniel Zelei
Oct 1
8 min read
2470 views
If you're a total beginner in embedded programming with Rust, I recommend checking out these resources first: Introduction to Embedded Systems with Rust and Building a Simple LED with ESP32.
Now, you've got your sensor (in this case, a DHT11), and you've decided you don't want to use an existing library from crates.io. Instead, you want to understand how these libraries work under the hood. Great! Let me guide you through the process. The crate is available on Github: rust-dd/embedded-dht-rs
Understand the Datasheet
First of all, you need to understand the sensor's specifications. If the website where you ordered it from didn’t provide a link, you’ll need to find it yourself. Try searching for "DHT11 datasheet" or "DHT11 specification." There are multiple datasheets out there, so it's important to find the one from your specific manufacturer that clearly describes how to interact with your sensor. In these datasheets, you’ll find important details like hardware specifications, pinouts, communication protocols, and data formats.
I’ll be using the following, which I believe best explains the process.

Wire It
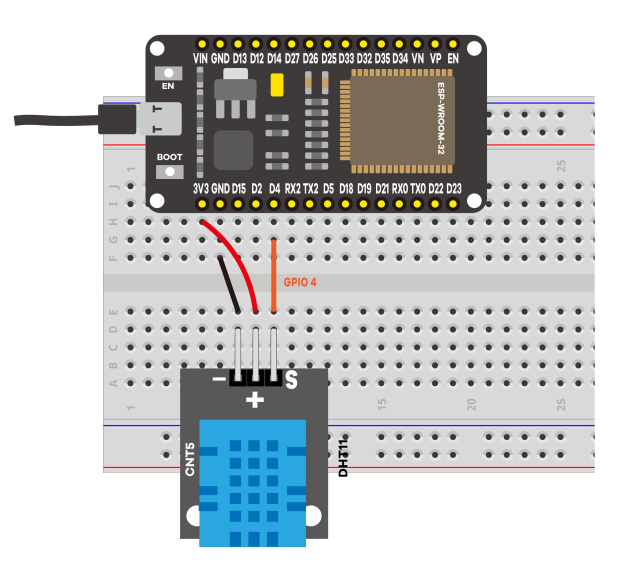
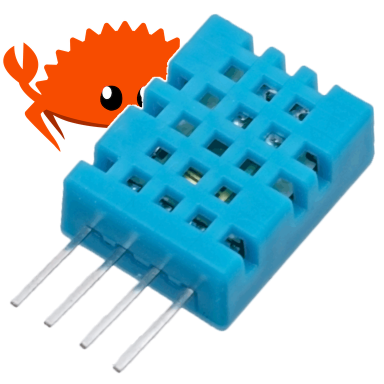
The DHT11 sensor typically has 3 pins:
- Vcc: Power supply, ranging from 3.5V to 5.5V
- Data: Outputs both temperature and humidity through serial data
- GND: Connected to the ground of the circuit
Sometimes there is a fourth pin labeled NC (No Connection), which isn't used.
To wire it up:
- Connect GND to your microcontroller's GND pin
- Connect Vcc to the power supply
- Connect the Data pin to one of your microcontroller’s GPIO pins
Here’s an example schematic:

Skeleton
First, create a new library:
cargo new --lib dht
This command generates a new library, which you can later publish if desired.
We will use only one library: 'embedded-hal', which provides a Hardware Abstraction Layer (HAL) for embedded systems.
cargo add embedded-hal
How to Start?
The DHT11 sensor uses a one-wire protocol, meaning the same wire handles both input (from the microcontroller to the sensor) and output (from the sensor to the microcontroller).
If you've already reviewed the datasheet (which you should do before this step), you'll know that communication flow and data format require precise timing. We need to manage delays in milliseconds and microseconds in our code to handle this correctly.
Let’s start by defining a structure that will serve as the interface for our library. This structure needs to include a pin for communication and a delay mechanism for handling those precise timing needs.
pub struct Dht11<P: InputPin + OutputPin, D: DelayNs> {
    pin: P,
    delay: D,
}
We also need a structure to return the temperature and humidity values. Note that humidity can only be a positive value.
pub struct SensorReading {
    pub humidity: u8,
    pub temperature: i8,
}
And now, let’s add a skeleton implementation for the Dht11 structure. Here’s how the entire code looks so far:
use embedded_hal::{
    delay::DelayNs,
    digital::{ErrorType, InputPin, OutputPin},
};

pub struct Dht11<P: InputPin + OutputPin, D: DelayNs> {
    pin: P,
    delay: D,
}

pub struct SensorReading {
    pub humidity: u8,
    pub temperature: i8,
}

impl<P: InputPin + OutputPin, D: DelayNs> Dht11<P, D> {
    pub fn new(pin: P, delay: D) -> Self {
        Self { pin, delay }
    }

    pub fn read(&mut self) -> Result<SensorReading, <P as ErrorType>::Error> {
        // Skeleton placeholder for actual reading process
        panic!("missing implementation");
    }
}
The Dht11 struct is designed with generic types for the pin and delay, allowing flexibility in how you implement these on your specific microcontroller. The new method initializes the struct with the pin and delay passed in. For now, the read method is a placeholder that will eventually contain the logic for reading data from the DHT11 sensor.
Initiate the Read
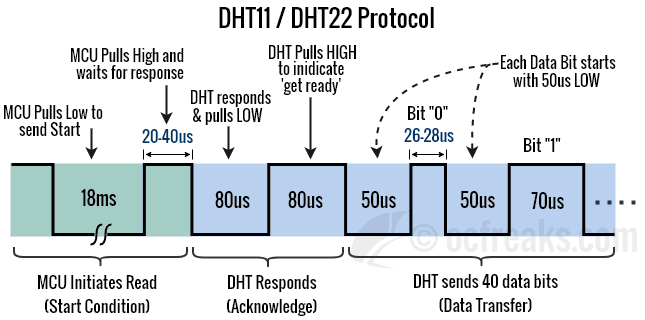
As you can see in the diagram (datasheet), we first need to send a start signal by pulling the data line low, waiting for 18 ms, then pulling it high, and waiting for the response (20–40 µs):
self.pin.set_low()?;
self.delay.delay_ms(18);
self.pin.set_high()?;
self.delay.delay_us(48);
After that, the DHT11 responds by pulling the line low for 80 µs and then high for another 80 µs to indicate it is ready. Since we don't have a built-in solution for waiting for these state changes, we'll implement our own. While this can be optimized, I've kept it verbose for clarity:
fn wait_until_state(&mut self, state: PinState) -> Result<(), P::Error> {
    loop {
        match state {
            PinState::Low => {
                if self.pin.is_low()? {
                    break;
                }
            }
            PinState::High => {
                if self.pin.is_high()? {
                    break;
                }
            }
        }
        self.delay.delay_us(1);
    }
    Ok(())
}
With this new method, we can now wait first for the high state and then for the low state:
self.wait_until_state(PinState::High)?;
self.wait_until_state(PinState::Low)?;
Why do we wait for high and then low, instead of low and then high as described above? Because after waiting for 48 µs, we already know that the line is in a low state. So first, we wait for the high state (which indicates that the sensor is ready), and then we wait for the low state, meaning it has started to send the first bits.
Reading the Data
Each bit transmission from the DHT11 sensor starts with a 50-microsecond low signal. Then:
- If the sensor keeps the line high for 26-28 microseconds, it represents a '0' bit.
- If it stays high for 70 microseconds, it represents a '1' bit.
So how can we determine the bit value? It's pretty straightforward:
- Wait for the line to go from low to high.
- Wait an additional 30 microseconds.
- Check the line state:
- If it's still high, it's a '1' bit.
- If it's low, it's a '0' bit.
Now, let's write a method to read a byte from the sensor:
fn read_byte(&mut self) -> Result<u8, <P as ErrorType>::Error> {
        let mut byte: u8 = 0;
        for n in 0..8 {
            let _ = self.wait_until_state(PinState::High);
            self.delay.delay_us(30);
            let is_bit_1 = self.pin.is_high();
            if is_bit_1.unwrap() {
                let bit_mask = 1 << (7 - (n % 8));
                byte |= bit_mask;
                let _ = self.wait_until_state(PinState::Low);
            }
        }
        Ok(byte)
    }
Wait a minute, what are these two extra lines doing?
let bit_mask = 1 << (7 - (n % 8));
byte |= bit_mask;
We need to assemble the 8 bits we read into a single byte. This is achieved using bit masking and bitwise OR operations. Let's break down what's happening with a real-life example.
Example: Reading a Temperature Value of 56°C
Suppose the DHT11 sensor sends the temperature data corresponding to 56°C. The binary representation of 56 is 0011_1000.
Here's how we assemble this byte:
-
Initialize
byteto0:let mut byte: u8 = 0b0000_0000; -
Assuming we read the bits in order (from most significant bit to least significant bit):
The bits are read in this sequence:
0, 0, 1, 1, 1, 0, 0, 0. -
For each bit read (
nfrom0to7):-
Bit 0 (
n = 0, bit value =0): Bit is0; no action needed. -
Bit 1 (
n = 1, bit value =0): Bit is0; no action needed. -
Bit 2 (
n = 2, bit value =1):-
Calculate
bit_mask:let bit_mask = 1 << (7 - (n % 8)); // 1 << 5 = 0b0010_0000 -
Update
byte:byte |= bit_mask; // byte = 0b0000_0000 | 0b0010_0000 = 0b0010_0000
-
-
Bit 3 (
n = 3, bit value =1):-
Calculate
bit_mask:let bit_mask = 1 << (7 - (n % 8)); // 1 << 4 = 0b0001_0000 -
Update
byte:byte |= bit_mask; // byte = 0b0010_0000 | 0b0001_0000 = 0b0011_0000
-
-
Bit 4 (
n = 4, bit value =1):-
Calculate
bit_mask:let bit_mask = 1 << (7 - (n % 8)); // 1 << 3 = 0b0000_1000 -
Update
byte:byte |= bit_mask; // byte = 0b0011_0000 | 0b0000_1000 = 0b0011_1000
-
-
Bit 5 (
n = 5, bit value =0): Bit is0; no action needed. -
Bit 6 (
n = 6, bit value =0): Bit is0; no action needed. -
Bit 7 (
n = 7, bit value =0): Bit is0; no action needed.
-
-
Final
bytevalue:byte = 0b0011_1000; // In decimal: 56
Finishing the library
In the final part, we need to read the humidity_integer, humidity_decimal, temperature_integer, and temperature_decimal bytes from the sensor:
let humidity_integer = self.read_byte();
let humidity_decimal = self.read_byte();
let temperature_integer = self.read_byte();
let temperature_decimal = self.read_byte();

Ok(SensorReading {
    humidity: humidity_integer.unwrap(),
    temperature: temperature_integer.unwrap() as i8,
})
As you can see, we are not using the decimal values. The reason is that for the DHT11 sensor, the decimal parts are always zero.
Summary
You can see that writing a library for a sensor like the DHT11 isn't too hard. What's missing is implementing checksum verification and writing a few tests, of course!
You can find the full code here, where you'll also find integrations for the DHT22 and DHT20 sensors.
#![no_std]

use embedded_hal::{
    delay::DelayNs,
    digital::{ErrorType, InputPin, OutputPin, PinState},
};

pub struct Dht11<P: InputPin + OutputPin, D: DelayNs> {
    pin: P,
    delay: D,
}

pub struct SensorReading {
    pub humidity: u8,
    pub temperature: i8,
}

impl<P: InputPin + OutputPin, D: DelayNs> Dht11<P, D> {
    pub fn new(pin: P, delay: D) -> Self {
        Self { pin, delay }
    }

    pub fn read(&mut self) -> Result<SensorReading, <P as ErrorType>::Error> {
        // Start communication: pull pin low for 18ms, then release.
        let _ = self.pin.set_low();
        self.delay.delay_ms(18);
        let _ = self.pin.set_high();

        // Wait for sensor to respond.
        self.delay.delay_us(48);

        // Sync with sensor: wait for high then low signals.
        let _ = self.wait_until_state(PinState::High);
        let _ = self.wait_until_state(PinState::Low);

        // Start reading 40 bits
        let humidity_integer = self.read_byte();
        let humidity_decimal = self.read_byte();
        let temperature_integer = self.read_byte();
        let temperature_decimal = self.read_byte();

        Ok(SensorReading {
            humidity: humidity_integer.unwrap(),
            temperature: temperature_integer.unwrap() as i8,
        })
    }

    fn read_byte(&mut self) -> Result<u8, <P as ErrorType>::Error> {
        let mut byte: u8 = 0;
        for n in 0..8 {
            let _ = self.wait_until_state(PinState::High);
            self.delay.delay_us(30);
            let is_bit_1 = self.pin.is_high();
            if is_bit_1.unwrap() {
                let bit_mask = 1 << (7 - (n % 8));
                byte |= bit_mask;
                let _ = self.wait_until_state(PinState::Low);
            }
        }
        Ok(byte)
    }

    fn wait_until_state(&mut self, state: PinState) -> Result<(), <P as ErrorType>::Error> {
        loop {
            match state {
                PinState::Low => {
                    if self.pin.is_low()? {
                        break;
                    }
                }
                PinState::High => {
                    if self.pin.is_high()? {
                        break;
                    }
                }
            };
            self.delay.delay_us(1);
        }
        Ok(())
    }
}
